image_pdfimage_print

Installierte .NET Framework Version prüfen

image_pdfimage_print

Disclaimer: Bei diesem Artikel handelt es sich definitiv nicht um eine eigene „Entwicklung“.

Nicht selten setzen Programme eine bestimmte .NET Version voraus. Windows bietet leider keine einfache Möglichkeit um diese herauszufinden. Einzig der definierte Registry Wert gibt uns einen Aufschluss auf die interne Build-Nummer, aber nicht auf die konkrete Version.

Ich bin bei Microsoft selbst auf ein Skript gestossen, welches ich seither auf mit der entsprechenden Build Tabelle nachgeführt habe:

    $dotNet4Builds = @{
        '30319'  = @{ Version = [System.Version]'4.0'                                                     }
        '378389' = @{ Version = [System.Version]'4.5'                                                     }
        '378675' = @{ Version = [System.Version]'4.5.1'   ; Comment = '(8.1/2012R2)'                      }
        '378758' = @{ Version = [System.Version]'4.5.1'   ; Comment = '(8/7 SP1/Vista SP2)'               }
        '379893' = @{ Version = [System.Version]'4.5.2'   ; Comment = '(all Windows OS)'                  }
        '380042' = @{ Version = [System.Version]'4.5'     ; Comment = 'and later with KB3168275 rollup'   }
        '393295' = @{ Version = [System.Version]'4.6'     ; Comment = '(Windows 10)'                      }
        '393297' = @{ Version = [System.Version]'4.6'     ; Comment = '(NON Windows 10)'                  }
        '394254' = @{ Version = [System.Version]'4.6.1'   ; Comment = '(Windows 10)'                      }
        '394271' = @{ Version = [System.Version]'4.6.1'   ; Comment = '(NON Windows 10)'                  }
        '394802' = @{ Version = [System.Version]'4.6.2'   ; Comment = '(Windows 10 Anniversary Update)'   }
        '394806' = @{ Version = [System.Version]'4.6.2'   ; Comment = '(NON Windows 10)'                  }
        '460798' = @{ Version = [System.Version]'4.7'     ; Comment = '(Windows 10 Creators Update)'      }
        '460805' = @{ Version = [System.Version]'4.7'     ; Comment = '(NON Windows 10)'                  }
        '461308' = @{ Version = [System.Version]'4.7.1'   ; Comment = '(Windows 10 Fall Creators Update)' }
        '461310' = @{ Version = [System.Version]'4.7.1'   ; Comment = '(NON Windows 10)'                  }
        '461808' = @{ Version = [System.Version]'4.7.2'   ; Comment = '(Windows 10 / 1803)'               }
        '461814' = @{ Version = [System.Version]'4.7.2'   ; Comment = '(other OS than Windows 10 1803)'   }
        '528040' = @{ Version = [System.Version]'4.8'     ; Comment = '(Windows 10 / 1905 & 1911)'        }
        '528372' = @{ Version = [System.Version]'4.8'     ; Comment = '(Windows 10 / 2005 & 2010 & 2105)' }
        '528449' = @{ Version = [System.Version]'4.8'     ; Comment = '(Windows 11 / Server 2022)'        }
        '528049' = @{ Version = [System.Version]'4.8'     ; Comment = '(other OS or Windows 10 builds)'   }
        '533320' = @{ Version = [System.Version]'4.8.1'   ; Comment = '(Windows 11 / 2022)'               }
        '533325' = @{ Version = [System.Version]'4.8.1'   ; Comment = '(other OS or Windows 10 builds)'   }
    }

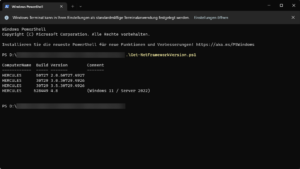
Die Ausführung sieht dann wie folgt aus:

Ich denke mit diesen Informationen kann man mehr anfangen als den reinen Build Nummern. ;-)

Viel Spass beim Nachbauen :-)

Installierte Windows Sprachpakete prüfen

image_pdfimage_print

In unseren Terminalservern und VDIs wollten wir mittels Scripten die Benutzer die OS Sprache ändern lassen. Die Aufbereitung des Images mittels Citrix AppLayering hatte so seine Tücken und für eine einfache Prüfung, ob und welche Sprachen zur Auswahl stehen, habe ich folgendes kleines Skript erstellt.

Es liest über WMI die OS Parameter aus und listet diese im Anschluss in der PowerShell Ausgabe:

$OSInfo = Get-WmiObject -Class Win32_OperatingSystem
$LanguagePacks = $OSInfo.MUILanguages
$LanguagePacks

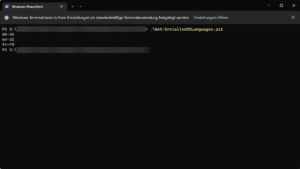
Die Ausgabe sieht dann wie folgt aus:

Viel Spass beim Nachbauen :-)

Citrix PVS Store – Replikationsskript V2

image_pdfimage_print

Im kürzlich erschienene Artikel habe ich die erste Fassung des Replikationsskriptes vorgestellt. In der aktuell überarbeiteten Version habe ich einerseits die Ausgaben ein wenig „verschönert“ und vor allem werden die Stores nun direkt aus dem PVS ausgelesen.

Voraussetzungen dafür sind:

  • Citrix PVS PowerShell Module an den Standardpfaden (kann in einer Variable angepasst werden)
  • Der ausführende Benutzer muss entsprechende PVS Rechte besitzen
  • Die Stores sollten verständliche Namen (Auswahl) und Beschreibungen (Hilfetexte bei Auswahl) vorweisen.

Zuerst wird nun also der Store Array dynamisch aus dem PVS ausgelesen. Voraussetzung dazu ist ein Laden des entsprechenden PVS PowerShell Moduls:

# Script variables
$PVSModulePath = "C:\Program Files\Citrix\Provisioning Services Console\Citrix.PVS.SnapIn.dll"

# Load PVS PowerShell module
Import-Module $PVSModulePath
# Get PVS vDisk stores from PVS configuration
# Create an array for later use
$Stores = Get-PvsStore

$StoreArray = $null
$StoreArray = @()
$StoreID = 0
ForEach ($Store in $Stores){
    $StoreID = $StoreID +1
    $SplitChar = $Store.Path.IndexOf(":")
    $StoreDisk = $Store.Path.Substring(0,$SplitChar)
    $StorePath = $Store.Path.Substring($SplitChar+1)
    $StoreName = $Store.StoreName
    $StoreArray += [pscustomobject]@{StoreID=$StoreID;Store=$StoreName;StoreDisk=$StoreDisk;StorePath=$StorePath;StoreDescription=$Store.Description}
}

Nun wird aus dem Array eine entsprechende PowerShell Auswahl generiert, wobei hier aktuell auch eine Limite von maximal 5 Stores eingebaut ist:

# Prompt for Store choice
$StoreTitle = "PVS vDisk stores"
$StoreMessage = "Chose the store to replicate:"
$CancelAll = New-Object System.Management.Automation.Host.ChoiceDescription "&Cancel", "Skip this operation and all subsequent operations."

# Generate choice output of each vDisk store to replicate
$StoreOptionCount = 0
ForEach ($Store2 in $StoreArray) {
    $StoreOptionCount = $StoreOptionCount + 1
    $ChoiceID = $Store2.StoreID
    $ChoiceStore = $Store2.Store
    $ChoiceHelp = $Store2.StoreDescription
    $ChoiceCmd = New-Object System.Management.Automation.Host.ChoiceDescription "&$ChoiceID $ChoiceStore", $ChoiceHelp
    New-Variable "StoreOption$ChoiceID" $ChoiceCmd
}

# Generate $StoreOptions variable for final choice output depending on the amount of options
Switch ($StoreOptionCount) {
    0 {$StoreOptions = [System.Management.Automation.Host.ChoiceDescription[]]($CancelAll)}
    1 {$StoreOptions = [System.Management.Automation.Host.ChoiceDescription[]]($CancelAll, $StoreOption1)}
    2 {$StoreOptions = [System.Management.Automation.Host.ChoiceDescription[]]($CancelAll, $StoreOption1, $StoreOption2)}
    3 {$StoreOptions = [System.Management.Automation.Host.ChoiceDescription[]]($CancelAll, $StoreOption1, $StoreOption2, $StoreOption3)}
    4 {$StoreOptions = [System.Management.Automation.Host.ChoiceDescription[]]($CancelAll, $StoreOption1, $StoreOption2, $StoreOption3, $StoreOption4)}
    5 {$StoreOptions = [System.Management.Automation.Host.ChoiceDescription[]]($CancelAll, $StoreOption1, $StoreOption2, $StoreOption3, $StoreOption4, $StoreOption5)}
}

Zu guter Letzt werden anhand der Auswahl die Variablen definiert:

# Prepare variables after the user entry
If ($Store2Replicate -eq 0) {
    # Cancel all
    return; break
}
Else {
    $IDStore = $Store2Replicate-1
    $StoreDisk = $StoreArray[$IDStore].StoreDisk
    $StorePath = $StoreArray[$IDStore].StorePath
    $LocalStore = $StoreDisk + ":" + $StorePath + "\"
    $RemoteStore = "\\" + $PVSRemote + "\" + $StoreDisk + "$" + $StorePath + "\"
    $LocalStorePath = $LocalStore + "*"
    $RemoteStorePath = $RemoteStore + "*"
}

Der restliche Teil ist soweit gleich geblieben und im ersten Artikel bereits beschrieben.

Viel Spass beim Nachbauen :-)

Citrix PVS Store – Replikationsskript

image_pdfimage_print

Citrix Provisioning ist seit Jahren eine super Methode um Citrix Worker zu provisionieren. In der Konsole gibt es zwar seit ich denken kann die Möglichkeit den Replikationsstatus zu prüfen, jedoch bietet Citrix da keine eigenen Mechanismen innerhalb des PVS.

Wie viele andere auch haben wir seit Jahren auf einfache Skripte gesetzt, welche die lokalen Verzeichnisse zwischen den Servern kopiert. Mit dem Nachteil, dass bei mehreren Admins es zu grossen Kopierjobs kommen kann, wenn verschiedene vDisks gepflegt werden. Citrix hat dafür schon seit längerem das vDisk Replicator Utility veröffentlicht, welches wir jedoch nicht installieren wollten. Es ist für unsere Zwecke auch ein wenig überdimensioniert.

Ich habe mich dafür einmal hingesetzt und auf Basis unseres einfachen Skriptes ein neues mit Powershell kreiert, welches folgende Anforderungen erfüllen sollte:

  • das Skript sollte evaluieren, welches der lokale und welches der Remote PVS ist
  • das Skript sollte für mehrere Stores nutzbar sein – mit Auswahl
  • das Skript sollte innerhalb des gewählten Stores die möglichen zu kopierenden vDisks als Auswahl bereitstellen

Die erste Anforderung war leicht und schnell implementiert:

# Script variables
$PVS01 = "pvs01.domain.pit"
$PVS02 = "pvs02.domain.pit"

# Enumerate the local and the remote PVS
$PVSLocal = $env:COMPUTERNAME + ".domain.pit"
If ($PVSLocal -eq $PVS01) {
    $PVSRemote = $PVS02
}
Else {
    $PVSRemote = $PVS01
}

Für die Store-Auswahl habe ich mich in dieser ersten Skript-Version mit einem statischen Array begnügt:

# Define PVS vDisk stores
# Create an array for each store and let the user chose which one should be checked
# If a store is added to the array, the option has to be added for the choice as well
$StoreArray = @()
$StoreArray += [pscustomobject]@{Store="VDI";StoreDisk="V";StorePath="\vDisks\VDI"}
$StoreArray += [pscustomobject]@{Store="RDSH";StoreDisk="R";StorePath="\vDisks\RDSH"}
$StoreArray += [pscustomobject]@{Store="Test";StoreDisk="T";StorePath="\vDisks\Test"}

# Prompt for Store choice
$StoreTitle = "PVS Store"
$StoreMessage = "Which PVS store will you replicate"
$Store1 = New-Object System.Management.Automation.Host.ChoiceDescription "&VDI Store", "VDI"
$Store2 = New-Object System.Management.Automation.Host.ChoiceDescription "&RDSH Store", "RDSH"
$Store3 = New-Object System.Management.Automation.Host.ChoiceDescription "&Test Store", "TEST"
$StoreOptions = [System.Management.Automation.Host.ChoiceDescription[]]($Store1, $Store2, $Store3)
$Store2Replicate=$host.ui.PromptForChoice($StoreTitle, $StoreMessage, $StoreOptions, 2)

Anhand der Auswahl werden die nächsten Variablen definiert und das lokale und remote Verzeichnis verglichen, ohne den WriteCache Ordner und allfällige .lok oder .i.vhdx Dateien:

# Prepare variables after the user entry
$StoreID = $Store2Replicate
$StoreDisk = $StoreArray[$StoreID].StoreDisk
$StorePath = $StoreArray[$StoreID].StorePath
$LocalStore = $StoreDisk + ":" + $StorePath + "\"
$RemoteStore = "\\" + $PVSRemote + "\" + $StoreDisk + "$" + $StorePath + "\"
$LocalStorePath = $LocalStore + "*"
$RemoteStorePath = $RemoteStore + "*"

# Compare servers
$LocalStoreContent = Get-ChildItem -Path $LocalStorePath -Exclude WriteCache,*.lok,*.i.vhdx
$RemoteStoreContent = Get-ChildItem -Path $RemoteStorePath -Exclude WriteCache,*.lok,*.i.vhdx
$StoreDiff = Compare-Object -ReferenceObject $LocalStoreContent -DifferenceObject $RemoteStoreContent -Property Name, LastWriteTime

Die gefundenen Differenzen werden verglichen. Uns interessiert bei Ausführung des Skriptes jedoch nur, was auf unserem lokalen Server zum Kopieren ist (SideIndicator „<=“), sowie die eigentlichen vDisks (*.vhd*) ohne die Konfigurationsdateien. Aus diesen Informationen wird das nächste Array erstellt:

# Enumerate a list of vDisks
# Create an array with all disk names
$DiskArray = $null
$DiskArray = @()
$DiskID = 1
ForEach ($File in $StoreDiff) {
    If ($File.SideIndicator -eq "<="){
        $Filename = $File.Name
        If ($Filename -like "*.vhd*") {
            $DiskID = $DiskID+1
            $SplitChar = $Filename.IndexOf(".")
            $DiskName = $Filename.Substring(0, $SplitChar)
            $PVPName = $DiskName + ".pvp"
            $DiskArray += [pscustomobject]@{DiskID=$DiskID;vDisk=$Filename;vDiskName=$DiskName;PVPName=$PVPName}        
        }
    }
}

Aus diesem Array heraus wird dann die nächste Auswahl generiert. Die Auswahl enthält als erstes und auch Standardauswahl die Option alles zu kopieren und die Variante abzubrechen. Aktuell ist vorgesehen, dass maximal fünf vDisks zur Auswahl gestellt werden können für einen einzelnen Kopier-Job:

# Prompt for replication choice
$ReplTitle = "vDisk replication"
$ReplMessage = "Choose what to replicate"
$vDiskAll = New-Object System.Management.Automation.Host.ChoiceDescription "&All vDisks","Continue with all vDisks."
$CancelAll = New-Object System.Management.Automation.Host.ChoiceDescription "&Cancel", "Skip this operation and all subsequent operations."

# Generate choice output of each vDisk to replicate
$ReplOptionCount = 0
ForEach ($vDisk in $DiskArray) {
    $ReplOptionCount = $ReplOptionCount +1
    $ChoiceID = $vDisk.DiskID
    $ChoiceDisk = $vDisk.vDiskName
    $ChoiceCmd = New-Object System.Management.Automation.Host.ChoiceDescription "&$ChoiceID $ChoiceDisk", "Replicate selected vDisk."
    New-Variable "ReplOption$ChoiceID" $ChoiceCmd
}

# Generate $ReplOptions variable for final choice output depending on the amount of options
Switch ($ReplOptionCount) {
    0 {$ReplOptions = [System.Management.Automation.Host.ChoiceDescription[]]($vDiskAll, $CancelAll)}
    1 {$ReplOptions = [System.Management.Automation.Host.ChoiceDescription[]]($vDiskAll, $CancelAll, $ReplOption2)}
    2 {$ReplOptions = [System.Management.Automation.Host.ChoiceDescription[]]($vDiskAll, $CancelAll, $ReplOption2, $ReplOption3)}
    3 {$ReplOptions = [System.Management.Automation.Host.ChoiceDescription[]]($vDiskAll, $CancelAll, $ReplOption2, $ReplOption3, $ReplOption4)}
    4 {$ReplOptions = [System.Management.Automation.Host.ChoiceDescription[]]($vDiskAll, $CancelAll, $ReplOption2, $ReplOption3, $ReplOption4, $ReplOption5)}
    5 {$ReplOptions = [System.Management.Automation.Host.ChoiceDescription[]]($vDiskAll, $CancelAll, $ReplOption2, $ReplOption3, $ReplOption4, $ReplOption5, $ReplOption6)}
}

$vDisk2Replicate=$host.ui.PromptForChoice($ReplTitle, $ReplMessage, $ReplOptions, 0)

Nach der Auswahl werden entweder alle vDisks oder die ausgewählte kopiert, oder das Skript abgebrochen:

If ($vDisk2Replicate -eq 0) {
    # Copy all found vDisks and PVP files
    ForEach ($Disk in $DiskArray) {
        $SourcevDisk = $null
        $SourcePVP = $null
        $DestvDisk = $null
        $DestPVP = $null
        $vDiskFile = $Disk.vDisk
        $PVPFile = $Disk.PVPName

        $SourcevDisk = $LocalStore + $vDiskFile
        $SourcePVP = $LocalStore + $PVPFile
        $DestvDisk = $RemoteStore + $vDiskFile
        $DestPVP = $RemoteStore + $PVPFile

        Copy-Item $SourcevDisk -Destination $DestvDisk
        Copy-Item $SourcePVP -Destination $DestPVP
    }
}
ElseIf ($vDisk2Replicate -eq 1) {
    # Cancel all
    return; break
}
Else {
    # Copy the selected vDisk
    # ID has to be reduced by 2 to match the array IDs
    $SourceID = $vDisk2Replicate - 2
    $SourcevDisk = $null
    $SourcePVP = $null
    $DestvDisk = $null
    $DestPVP = $null
    $vDiskFile = $DiskArray[$SourceID].vDisk
    $PVPFile = $DiskArray[$SourceID].PVPName

    $SourcevDisk = $LocalStore + $vDiskFile
    $SourcePVP = $LocalStore + $PVPFile
    $DestvDisk = $RemoteStore + $vDiskFile
    $DestPVP = $RemoteStore + $PVPFile

    Copy-Item $SourcevDisk -Destination $DestvDisk
    Copy-Item $SourcePVP -Destination $DestPVP
}

Für einen ersten Wurf find ich das Skript nicht schlecht. Sollte ich die Zeit finden, könnte ich mir vorstellen, dass ich die Store-Auswahl auch noch dynamischer gestalte, in dem ich mittels Powershell die PVS Konfiguration abfrage. Ebenfalls fehlt aktuell noch so etwas wie ein Statusbalken. Das Ende des Kopierens erkennt man nur am geschlossenen Skriptfenster.

Viel Spass beim Nachbauen :-)